

Alas... late again! I had grand plans back in November... I even went out and purchased Jane Austen's Pride and Prejudice just for this project. Here it is the last day of the year and I'm playing catch-up on several months of this Dress-Up 2011 challenge. I suspect that it's a metaphor for life in general, eh?
Anyway.. I'll show you the dress in a series of process pictures below. I made it last night while my daughter read from the new Christopher Paolini book "Inheritance". There is nothing so lovely as working out design challenges, converting ideas of flowing fabric into three dimensional shape with the limitations of paper while your favorite person in the world reads enthusiastically (with voices) from this long awaited final book in the Eragon series.
The process started with what I thought would be a fantastic color choice - dying the pages in coffee.

Here's a tip... separate the pages from the spine glue BEFORE getting them wet!

They look great.. nice and brown, all laid out on the counter.

I put a non-dyed page on top to admire the color contrast.
Then.... they dried....
and
I had nice crinkly pages from Pride and Prejudice, but hardly any color. 'Suppose I could have done a little research into natural dyeing, but as with most projects, I just sort of jump in and hope for the best.
Yesterday, while waiting interminably for my most favorite person in the world to spend her gift certificate at a clothing store (teenage daughter + clothes shopping = timestandstill), I worked on sketches from ... yes, you guessed it, my historical fashion bible, John Peacock's Costume History 1600'a-1990s. I wanted to familiarize myself with the main elements that make a dress LOOK like a Jane Austen Era costume and not just make a dress based on one of his drawings. So, as the dressing room area chairs were thankfully comfortable, I studied his drawings and made some rough ones of my own.


Then it was time to construct the actual piece. I debated about whether to make a plan and sketch out EXACTLY how I was going to create the dress and ended up just beginning by attaching pages together to make some "fabric". I then worked on the decorative elements in the lower half of the skirts. Having applied an accordion style detail at the correct height of the skirt, I realized that the hem below it was flat and un interesting... so cut off the skirt under the decorative element and made a new "hem" with a severe box pleat. I colored all the insides of the pleat with a maroon pencil to give more depth.

Hopefully, you can see what I'm describing in the picture above.
I worked on the skirt first, as a flat piece.. then made tiny pleats all around and when I attached the edges, it stood on its own. Then I cut out the front of the bodice with darts and after a few tries, cut out a matching back piece. Tip: fold paper in half to get matching curves and angles!
Then... I started on the sleeves... I tried several prototypes - cutting circles with curvy darts, triangles fitted together...etc.
Here are a series of pictures my daughter took of my hands while I tried to sort out how to create a poufy sleeve cap...

First, I made a narrow accordion strip
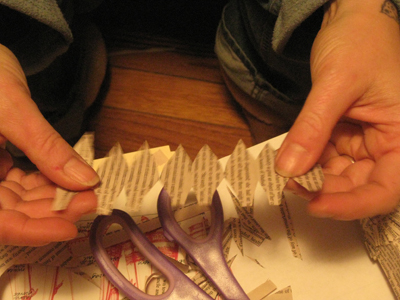

and then cut it in an approximation of the sleeve shape, trying to visualize the bell shape broken into even segments,

and fitted it in a sleeve cuff lined with double sided sticky on the inside.
To make the sleeve fall from the shoulder (instead of stick straight out) I cut the "petals" down significantly on the underside of the sleeve.
I coated a small strip of paper on both sides with double sided sticky to give a surface to attach all the tiny tips around the arm hole.
Tip: to make matching sleeves, don't get so excited that you complete construct the first one and attach it to the garment BEFORE cutting a second sleeve.
When I attached the two components together.. I was actually amazed. One never knows how these things will turn out. I added decorative "lace" by cutting curved bits from the white page borders and used that contrast on the waistband as well.
Here is the final piece.

I put it on top of one of these fantastic hot chocolate bowls we received from my sister for christmas... in addition to the reading, and photography, my daughter made us fabu hot chocolate to energize us throughout the evening.

Here is a detail of the assembled sleeve in place with "lace"

Although I did not plan which pages to use or what text to feature, it is fun to see familiar names all over the dress.

Here is a full front view and...

a back view... and ...

a detail of the ribbons.
This may be one of my favorite pieces I have ever made!
Happy last day of 2011.
Liza
This dress is absolutely fabulous! You are always amazing me with your creativity and skill.
ReplyDeleteLinda, Thank you for your gracious compliments!
ReplyDelete