Showing posts with label dress-up challenge. Show all posts

12.31.2011

December Dress-Up: Submission

Wow! a whole year of dresses... yes, I'm squeaking the last few in just under the wire and was relieved to find that I had not missed any other months along the way as I anxiously scrolled through my year of posts.

So... the challenge for this month was WINGS! I left the interpretation up to the individual - angel, faerie, butterfly...anything.

As always, I have a few process pictures for you, but the piece came together really quickly and I'm especially pleased with the overall ethereal nature.

Step one... must use organza fabric... somehow!

I made tiny wired wings with long stems first and sewed filmy organza to the edges with my favorite "see-through" thread.


Tip: after struggling with the first couple of wings, trying to sew fabric cut to size with a quarter inch allowance, I would recommend attaching a large piece and then just trimming away the excess!


Here are a few completed wings standing up in a glass.  I left the "stems" long because I had no idea what the dress was going to be made from. (I was that obsessed with the wing part of the project).

Since this was done a few days ago PRIOR to my annual studio "muck-out", there were lots of materials lying all over the place.  I cut a generic shift-style shape out of some clear plastic packaging and then laid it over the beautiful decorative motifs printed on my new Hammerpress 2012 calendar. (gift from the lovely daughteress).  As I reached for a sharpie to trace some of the filigree on to the dress, she became extremely alarmed that I was going to cut up the calendar for decoration on the dress. Once we got that all sorted out and everyone was calm again, I traced some curlicues and then freehanded the bee in the center.

To mask the wing stem and hefty glue attachment on the back, I drew some fake shirring on the front.

Here are some pickies.


It was difficult to photograph this piece since it is neither two nor three dimensional and see-through to boot.  For the photo above, I wedged it in a crack in the table...


Here is a close-up of the decorations... best to not look too closely- they look much better from afar!


Here it is next to the beautiful letterpress calendar.


Here's a shot of the back so you can see where I attached the wings.


And finally, a side view so you can see how slight it is.


I have really enjoyed this year long project started by the Lovely Angela at SewLoquacious.

I have not heard back from any of my "millions" of followers whether you would like to do the same project again or another topic on a monthly basis.  I would love to host again, but the last few months has been very quiet here at the Dress-up Challenge 2011 hosting headquarters and I don't know where you all went!

Please contact me if you'd like to resume or start another project.

I also posted November's submission this morning... take a look!

In the mean time, I'll be challenging myself to a rendering a day on my new "Dress-a-Day" page on this blog.  Check back often! 

Best wishes for the new year
Liza

November Dress-up: Classical or Neo Classical - submission

Alas... late again! I had grand plans back in November... I even went out and purchased Jane Austen's Pride and Prejudice just for this project.  Here it is the last day of the year and I'm playing catch-up on several months of this Dress-Up 2011 challenge.  I suspect that it's a metaphor for life in general, eh?

Anyway.. I'll show you the dress in a series of process pictures below. I made it last night while my daughter read from the new Christopher Paolini book "Inheritance".  There is nothing so lovely as working out design challenges, converting ideas of flowing fabric into three dimensional shape with the limitations of paper while your favorite person in the world reads enthusiastically (with voices) from this long awaited final book in the Eragon series.

The process started with what I thought would be a fantastic color choice - dying the pages in coffee.

Here's a tip... separate the pages from the spine glue BEFORE getting them wet!


They look great.. nice and brown, all laid out on the counter.


I put a non-dyed page on top to admire the color contrast.

Then.... they dried....

and

I had nice crinkly pages from Pride and Prejudice, but hardly any color.  'Suppose I could have done a little research into natural dyeing, but as with most projects, I just sort of jump in and hope for the best.

Yesterday, while waiting interminably for my most favorite person in the world to spend her gift certificate at a clothing store (teenage daughter + clothes shopping = timestandstill), I worked on sketches from ... yes, you guessed it, my historical fashion bible, John Peacock's Costume History 1600'a-1990s. I wanted to familiarize myself with the main elements that make a dress LOOK like a Jane Austen Era costume and not just make a dress based on one of his drawings. So, as the dressing room area chairs were thankfully comfortable, I studied his drawings and made some rough ones of my own.
Then it was time to construct the actual piece.  I debated about whether to make a plan and sketch out EXACTLY how I was going to create the dress and ended up just beginning by attaching pages together to make some "fabric".  I then worked on the decorative elements in the lower half of the skirts.  Having applied an accordion style detail at the correct height of the skirt, I realized that the hem below it was flat and un interesting... so cut off the skirt under the decorative element and made a new "hem" with a severe box pleat.  I colored all the insides of the pleat with a maroon pencil to give more depth.

Hopefully, you can see what I'm describing in the picture above.

I worked on the skirt first, as a flat piece.. then made tiny pleats all around and when I attached the edges, it stood on its own. Then I cut out the front of the bodice with darts and after a few tries, cut out a matching back piece. Tip: fold paper in half to get matching curves and angles!

Then... I started on the sleeves... I tried several prototypes - cutting circles with curvy darts, triangles fitted together...etc.

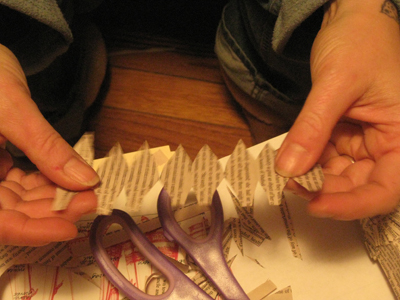
Here are a series of pictures my daughter took of my hands while I tried to sort out how to create a poufy sleeve cap...


First, I made a narrow accordion strip


and then cut it in an approximation of the sleeve shape, trying to visualize the bell shape broken into even segments,


and fitted it in a sleeve cuff lined with double sided sticky on the inside.
To make the sleeve fall from the shoulder (instead of stick straight out) I cut the "petals" down significantly on the underside of the sleeve.

I coated a small strip of paper on both sides with double sided sticky to give a surface to attach all the tiny tips around the arm hole.

Tip: to make matching sleeves, don't get so excited that you complete construct the first one and attach it to the garment BEFORE cutting a second sleeve.

When I attached the two components together.. I was actually amazed. One never knows how these things will turn out. I added decorative "lace" by cutting curved bits from the white page borders and used that contrast on the waistband as well.

Here is the final piece.


I put it on top of one of these fantastic hot chocolate bowls we received from my sister for christmas... in addition to the reading, and photography, my daughter made us fabu hot chocolate to energize us throughout the evening.


Here is a detail of the assembled sleeve in place with "lace"


Although I did not plan which pages to use or what text to feature, it is fun to see familiar names all over the dress.


Here is a full front view and...


a back view... and ...


a detail of the ribbons.

This may be one of my favorite pieces I have ever made!

Happy last day of 2011.

Liza


12.15.2011

December Dress-Up Here is your Challenge!

Anything with wings! Think about it... in the northern hemisphere, Christmas time, what do we have, but ANGELS singing and what about the warmer climates to the south? How about FAIRIES! From Angels to Fairies... that is a wide spectrum of design choices! From delicate dragon fly wings to heavy multi layered angel wings.... what beautiful elements to create and add to a dress of your choice!


I look forward to seeing all your submissions!

This has been an incredible year of creativity within the seemingly limited parameters of paper dresses.  Collectively we have witnessed artistic blossoming, design challenges met with gusto and so much variation.  I have really loved being involved with this year long challenge and have been honored to be hosting it for the last part of the year.  Thank you Angela, for launching this project for 2011 and for creating such beautiful submissions.  I am interested to hear whether people are inspired for another year of dresses or whether YOU would like to move to another passion?  I've seen purses and tags and bags and of course artist trading cards... what about shoes? chairs or other furniture? hats, animals, houses, faces, any ideas clicking here? What about recycle or upcycle projects with monthly themes? Tell me what you think!

Have a beautiful day
with love and best wishes
Liza

Here is the link tool for December's Dress-up

11.13.2011

October Dress-up Catch-up submission!

You'd think that since I'm the hostess of the Dress-up 2011, I would be able to keep up with all the other fabulous participants... alas, this has not yet proved to be true!

However, I have just completed October: Steam Punk and have more than half the month to finish November: Classical or NeoClassical....can I catch up with you guys?

I borrowed some style from the impeccable Mr. John Peacock (again) and modeled my dress loosely on this illustration:


Next, I checked out this fantastic book from the Lawrence Public Library on the history of clocks and time keeping devices through out history:


Have I mentioned how much I love my job? You'd think that I just now discovered the riches a library can hold... more like renewing an old love I suppose... It's just as exciting to search and discover information as when I was set loose to roam the Boulder Public Library when I was very young.

But I digress, back to the project...
Here are just a few of the 20 or so pages i bookmarked for the project:


So much artistry and engineering and precision went into the completed pieces - even the illustrations are stunning.

I had great plans to incorporate steam engines and clock works and all sorts of steam punk/sci fi stylings into this dress, but became enamoured with just the clocks and filigrees and gears and wheels....


She's about 17 inches tall; white colored pencil and white acrylic paint on black craft paper.

I hope you like her!

Have a great week
Creatively yours,
Liza

11.06.2011

Tending to the Pilot Light Day of the Dead Shrines

As requested, we made Day of the Dead shrines AGAIN!  A perfect activity for this time of year.  Here are a bunch more pictures of the AMAZING work my students have produced in just a few hours!


Notice the stamp on the inside left panel... perfect, eh? Thomas Howe, do you read this blog? You always use the most interesting stamps on your mailings (and I save every one)!!


Here is the outside of the same Pirate-themed shrine made out of an Altoids tin!


This is a large piece, full of details and color....


And look at this happy fellow basking in the shade on top!


This is a great composition, two halves of the whole, split twice... lovely arrangement.


A close up of the side...


Another petite composition assembled in an Altoids Tin, complete with roses, tea cup, pearls and pretty bows 


Here is the outside of the tin, decorated with layers of tissue paper and hand written music.


Check out this splendid tower - multi levels of creativity and imagery


Even more decoration and sparkle on the back side


These calm images grace the inside of a slender cd mailer tin


Beautiful work from beautiful people.


Here's a new shrine (to fashion?) I made during this week's classes and a few original skeletons made of pipe cleaners....


Here's a Frida Kahlo Skeleton to go with my costume for work on the 31st...


Here's one more skeleton


See her cute bustle?


Here is what I've been designing agonizing over this week:

The Holiday Art Fair poster... I wanted to make something evocative of winter shopping... that chill in the air, that cozy shops beckoning you inside, that downtown Lawrence Feel... here is the first stage...


I designed it with white paint on black to A. save money on printing, and B. because I have finally started my October Dress Up Challenge (Steampunk) and was really happy with the way my clock details were coming out on the black paper...


Here is a pretty close to final version... It will probably be tweaked some more, but at least I am past both the staring-at-the-blank -page phase... AND, the I've-worked-allllll-day-on-this-and-it's-garbage-phase!  Thanks to Elsie, Brennan and Amanda for your excellent feedback... SHAZAAAAAAAMMMM


This week in Tending to the Pilot Light, we will be making Yarn Wrapped Wreaths!  Join us for some crafty fun!

best to you
Liza
Related Posts Plugin for WordPress, Blogger...